Authorization code / PKCE
An overview of integration with a User facing application
What is Authorization Code / PKCE?
PKCE is an OAuth 2.0 security extension for public clients on User facing devices intended to provide a secure mechanism for authorizing a User while providing a high level of security during the process.
It efficiently uses a dynamically generated password during the process and achieves this by doing some setup work before the flow begins and some verification at the end of the flow.
Proof Key for Code Exchange as known as PKCE is a code generated key for preventing malicious attacks and securely performing a code authorization flow.\
How does it achieve secure Authorization?
This flow basically works with two parameters Code Challenge and Code Verifier. Let's see what are these parameters, how they're used generated.\
PKCE code verifier and challenge
The code verifier is a cryptographically random string using the characters A-Z, a-z, 0-9, and punctuation characters -._~ (hyphen, period, underscore, and tilde) .
It's length can be 43 - 128 characters. The client has generated the code verifier at the beginning of the flow and it uses this verifier in order to create the code challenge.
The code challenge itself is a Base64-URL-encoded string of the SHA256 hash of the code verifier.\
Let's get Authorized!
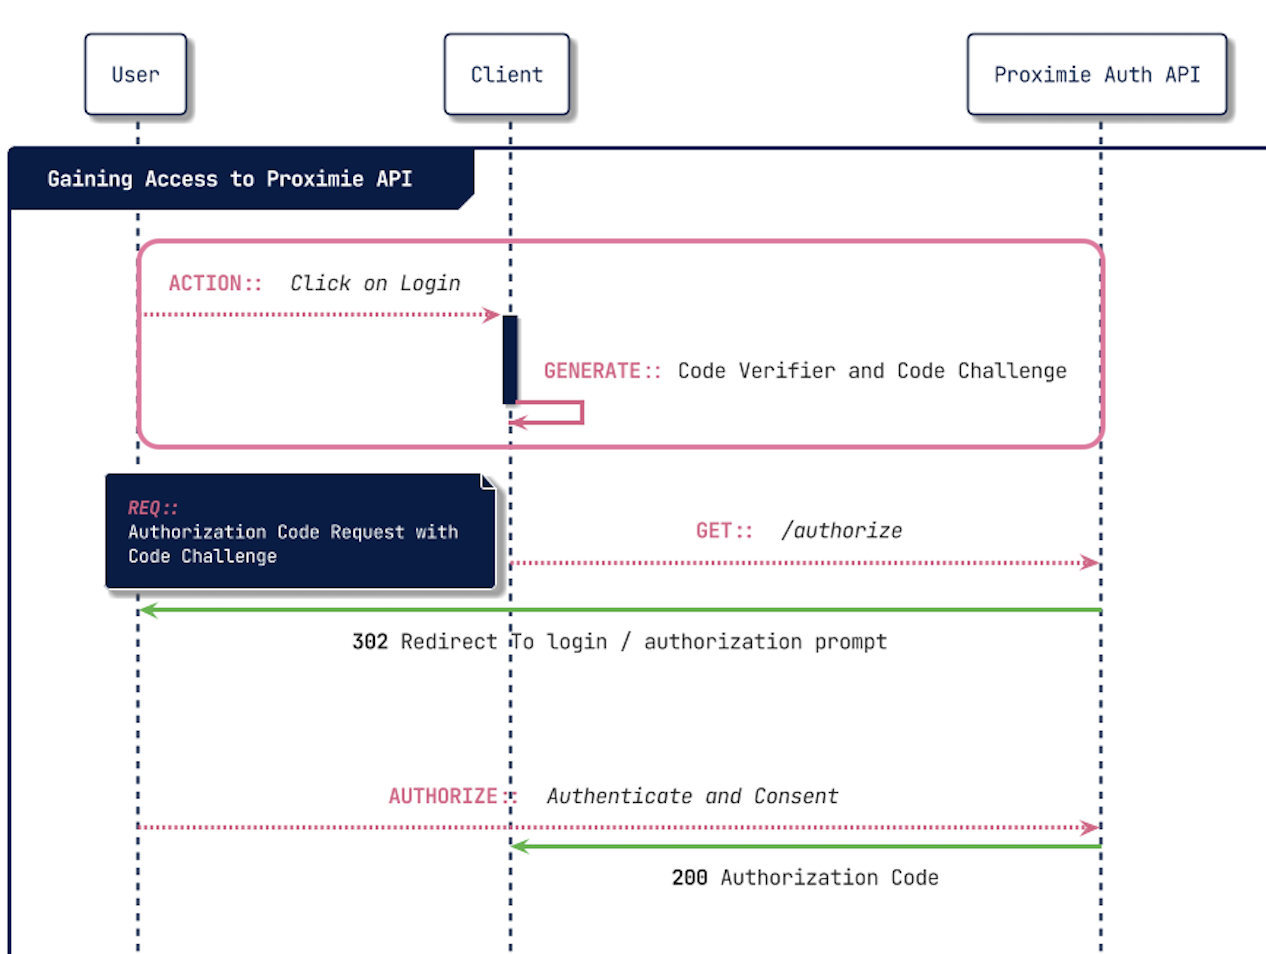
Generating the Code Challenge and Code Verifier
To clearly understand how we can authorize our client with this flow, let's walk through the steps.
Before we begin, we must generate the Code Challenge and Code Verifier on the client we want to authorise.\

Here is an example of how we might generate it in code.
/**
 * Import the crypto library to use for creation
 **/
var crypto = require("crypto")

/**
 * A function that will Base64 encode our SHA-264 hash
 **/
function base64URLEncode(hashedCodeVerifier) {
    return hashedCodeVerifier.toString('base64')
        .replace(/\+/g, '-')
        .replace(/\//g, '_')
        .replace(/=/g, '');
}

/**
 * A function that will create a SHA-256 hash of our Code Challenge
 **/
function sha256(codeChallenge) {
    return crypto.createHash('sha256')
      .update(codeChallenge)
      .digest();
}

/* Create the verifier for our challenge */
var codeVerifier = base64URLEncode(crypto.randomBytes(32));
console.log("code_verifier: ", codeVerifier)

/* Check the verifier exists */
if(codeVerifier){
    /* Create the challenge by hashing the verifier and base64 encoding it */
    var codeChallenge = base64URLEncode(sha256(verifier));
    /* Congratulations. You now have the challenge created */
    console.log("code_challenge: ", codeChallenge)
}
Request for an Authorization Code
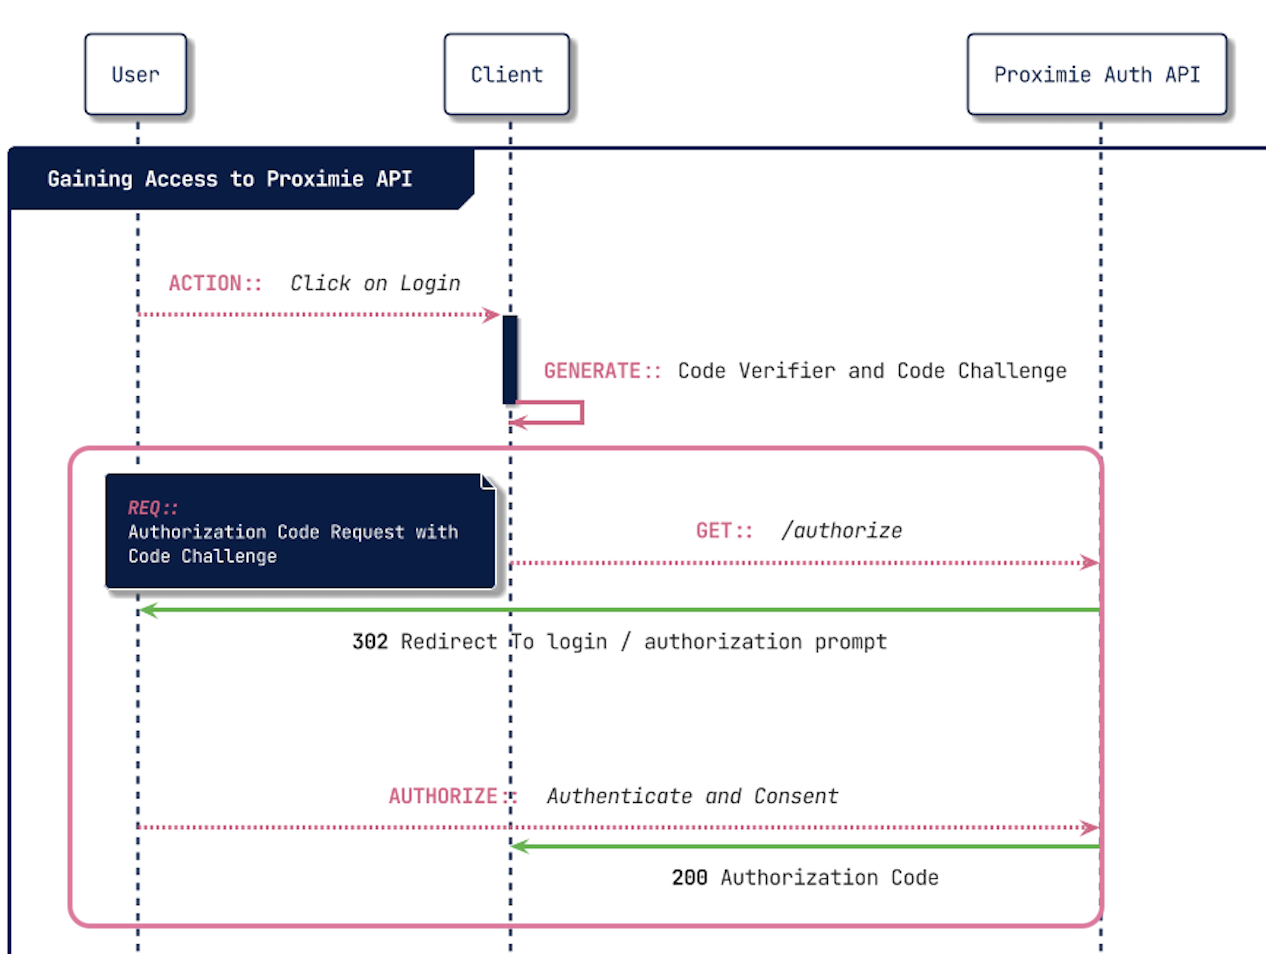
Now that we have our Code Challenge and Code Verifier we can make our first request to the Proximie Auth API.

The initial request will require us to send more than just the Code Challenge and Code Verifier to the Proximie Auth API. Lets have a look at what fields are required.
Request Field | Description |
|---|---|
response_type | This is the type of response we are looking for. For this flow, the value must be code |
code_challenge | The generated challenge from the code_verifier. |
code_challenge_method | The PKCE spec defines two methods, |
client_id | The ID of the client application making the request |
redirect_uri | The URL to which Proximie Auth API will redirect the response to after authorization has been granted by the user |
state | Used to indicate what action in the app to perform after authorization is complete |
Below we have a breakdown of the Authorise request to begin the flow.
https://auth.proximie.net/authorize?
client_id={client_id}
&redirect_uri={Callback URL}
&response_type=code
&state={random long string}
&code_challenge={code challenge}
&code_challenge_method=S256
If all goes well, you'll receive an HTTP 302 response. The User is then redirected to the Login Prompt for the identity provider. After successful login the Authorization Code is included at the end of the response URL response:
HTTP/1.1 302 Found
Location: {YOUR_REDIRECT_URI}?code=AUTHORIZATION_CODE&state={YOUR_STATE}
Request for an Access Tokens
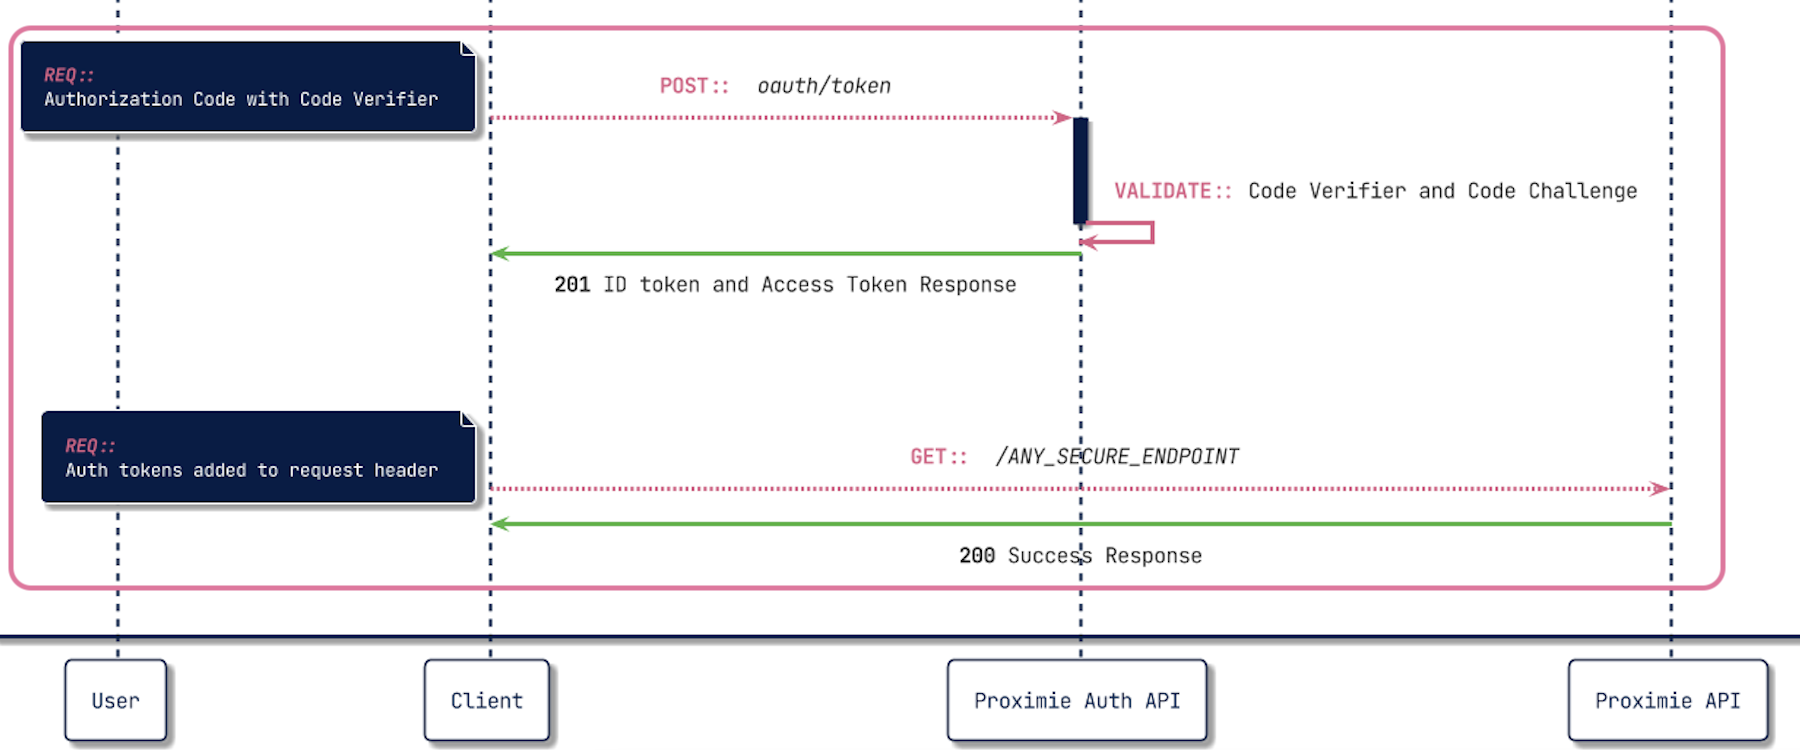
Our client now has received the required Authorization Code which will allow us to receive the Access Tokens required to gain access to the Proximie API.

Lets look at a breakdown of what is included in the Access Tokens request.
Request Field | Description |
|---|---|
grant_type | The type of request values you will be sending. Set this to authorization_code . |
code_verifier | The Code Verifier key that was generated in the first step of this guide. |
code | The Authorization Code that was returned when we logged in the User using the Identity provider. |
client_id | The ID of the client application making the request |
redirect_uri | This must exactly match the redirect_uri passed to the *Authorization Code request in the previous step. Note that this must be URL encoded. |
Let's see a breakdown how how this request ties together.
POST https://auth.proximie.net/oauth/token

Request body:
{
   grant_type:authorization_code,
   code_verifier: {CODE_VERIFIER}, // generated in the first step
   code:{AUTHORIZATION_CODE}, // That we have received in authorization request
   client_id:{CLIENT_ID},
   redirect_uri:{REDIRECT_URI}
}
If the request goes well you can expect a response containing all the fields required to gain access to the Proximie API.
{
  "accessToken": "AYjcyMzY3ZDhiNmJkNTY",
  "refreshToken": "RjY2NjM5NzA2OWJjuE7c",
  "tokenType": "bearer",
  "expires": 3600
}
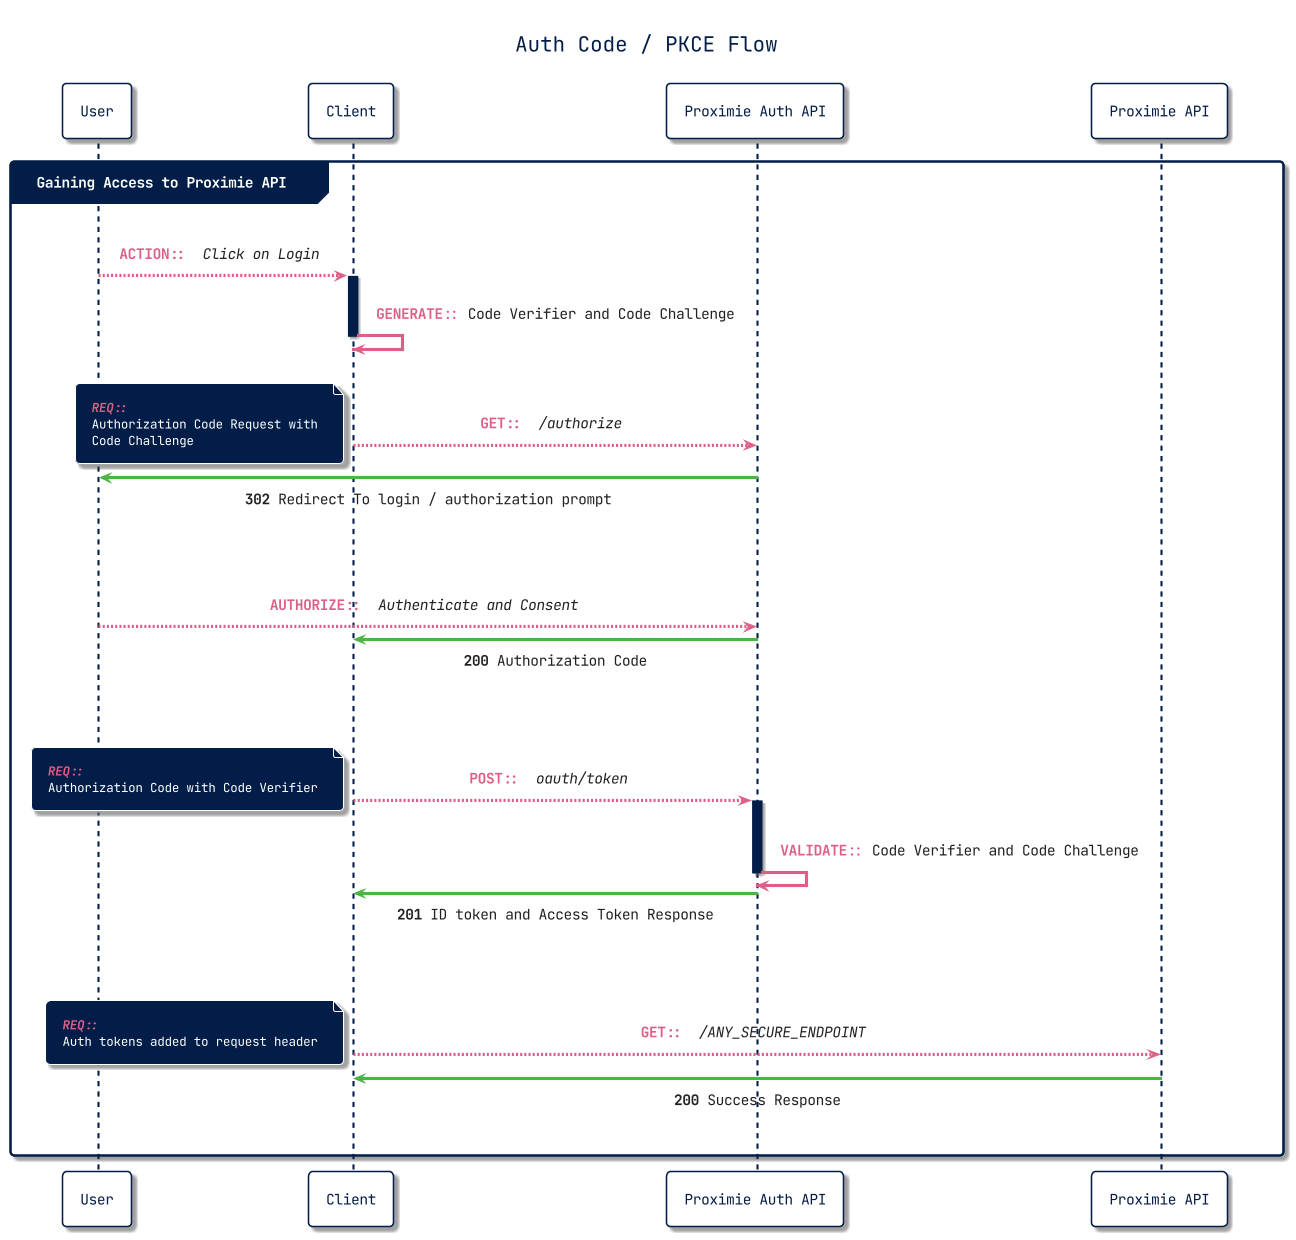
Full overview of the flow from start to finish.

Updated 4 months ago
